Jessica Johansen is a digital marketer, consultant and blogger who writes about wellness, self-love, fitness and great food. She’s passionate about helping her readers live their best lives and feel great, even on a crazy busy schedule!
Hello, lovely people! It’s great to be here – thanks for having me, Uncustomary! So, for those of you who don’t know me, I’m pretty big on self-love. Trust me when I say I didn’t always used to be: you can read more about it here if you’re so inclined (thanks!), but suffice it to say that my journey to self-acceptance and away from self-sabotage has been a pretty long-winded affair so far! The good news is that while I’m still learning to love myself with all my kinks and funny bits, it’s also been a wonderful process – one punctuated with happy tears, BIG hugs and delicious offerings like the ones I’m about to share with you.
Because, yeah… As far as I’m concerned, self-love definitely also comes in the form of delicious, healthy treats! Think about it: what better way is there to serenade yourself than by baking super tasty cookies that are actually good for you, and writing love notes to yourself on them in the process?! Thought so! All kidding aside, these self-love cookies have everything you could want in a treat – the flavor, the crunch, the sweetness – without any nasty stuff; they’re basically pure love, hidden away in cookie form!
Make these when you need a little pick-me-up or, you know, just want to eat a plateful of cookies that have a bunch of nice stuff written on them, all the while knowing that you’re doing your body a world of good. These babies are refined sugar- and gluten-free, so enjoy without moderation!
Delicious Healthy Self-Love Cookies
Makes around 6 cookies
For the cookies:
· 1 cup fine almond flour (I like Bob’s Mill)
· 1/8 tsp sea salt
· 1/8 tsp baking soda
· Zest of 1 lemon
· 1 tsp vanilla essence
· 1 tsp lemon extract
· 2 tbsp maple syrup
· 1 ½ tbsp either vegetable oil or melted coconut oil
· 1-2 tbsp milk
For decorating:
· ¼ cup either xylitol or erythritol (if sugar-free), or icing sugar
· 1 tsp lemon extract
· Milk
· Icing pen

1. Mix all the liquid ingredients for your cookies together, except the milk. In a separate bowl, combine all the dry ingredients together.
2. Add the wet ingredients into the dry, mixing well. It’ll be very clumpy at first, but don’t fear: this is where the milk comes in! Add a little milk in at a time, until the mixture comes together. You don’t want to add too much milk, just enough to be able to smush the mixture into a ball.
3. Add the mixture into a plastic bag (freezer bags work well for this!) and – you’ve guessed it – smush all the ingredients together so that they’re well combined and form a dough.
4. Make space on your kitchen counter and place your dough on a sheet of parchment paper. Cover with another sheet, then roll out to cookie cutter thickness (about 1/3 to ½ an inch).
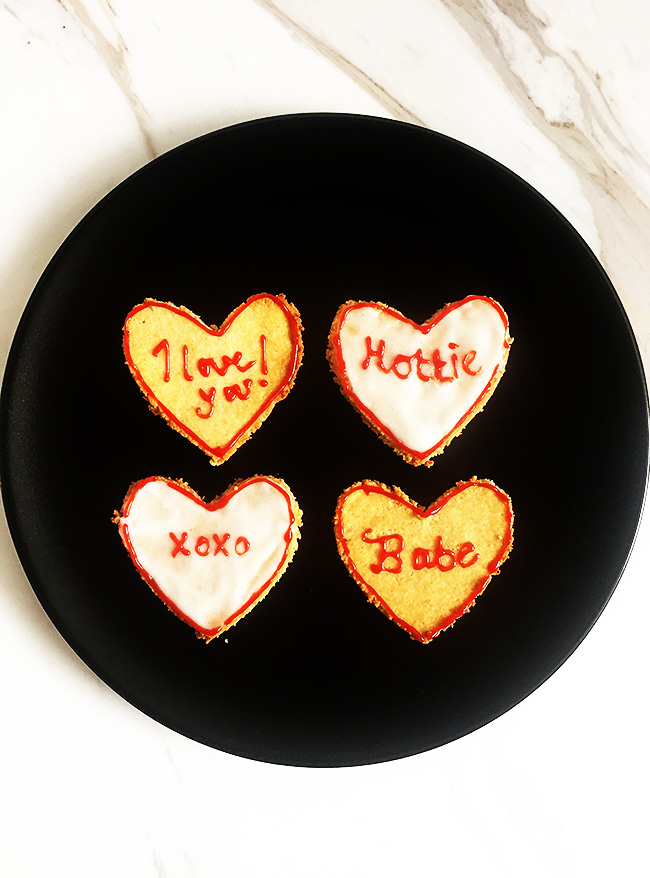
5. Using a cookie cutter or a stencil and knife (that’s what I did), cut the dough into hearts! I managed to get four out of the initial rolled out dough, and an extra two when I salvaged and repurposed the bits that didn’t make it into cookies the first time around.
6. Pop the raw cookies into your freezer for at least 20 minutes (you may want to cover them with the parchment paper again to protect them).
7. Heat your oven to 325°F/160°C. Once hot, place your cookies in the middle and bake for 10-13 minutes depending on how crispy you want them. I baked mine for 12 and they turned out chewy in the middle and crispy on the edges – perfect!
8. When they’re done baking, let them rest for at least 10 minutes before attempting to get them off the parchment paper. They’ll seem very soft when you first pull them out, but they’ll firm up nicely.
9. While your cookies are crisping up, make the icing by blitzing your erythritol/xylitol in a food processor for a few seconds to make icing sugar (if using icing sugar, then obviously skip this step). Stir in the lemon extract, then sloooowly add the milk until you achieve icing-like consistency.
10. Gently smooth a little icing over the tops of three of the cookies, making sure it goes on at least semi-evenly (don’t worry if it’s a little patchy – these aren’t meant to be perfect!). Let it set a little while you decorate the other three cookies!
11. Grab your icing pen (mine was red, as you can see) and go to town decorating your other cookies while the first three set! Really try and make the most of the space you have to write love letters to yourself. Give yourself compliments. Serenade yourself. Tell yourself how much you love yourself. Make these as over-the-top as you like – remember, it’s all about feeling good!
12. Once you’re done with the first three, let loose on the three iced cookies.
13. ENJOY!
Okay these cookies are adorable, and appear delicious. Are you excited to make them? It would be so much fun to make them with a friend, and you could write things you love about yourself and them on the cookies as a surprise! Thanks so much to Jessica for doing this for us, she’s seriously rad. Go stop by her blog and Twitter and tell her Uncustomary sent you! (And in case you missed it, I did a guest post for her, too, on self love!)


Yes! This is my kind of recipe, the ingredients are so familiar to a gluten-free vegan. ^-^ Love the decorating, too. Thank you for sharing, Jessica!
Awesome!! I’m glad it looks appetizing and feasible to you, Carly! 🙂 Thanks again Jessica!
I’m so glad you like the look of this, Carly! Thanks for the sweet comment and I hope you enjoy them! 🙂
Monster Cookie Heart Squad approved! xoxox
Thank god!! I was worried for a bit. 😉
XD
Good to hear! 😀