There are a lot of people in this world, myself included, who can’t collage. We try. You try to tell us that anyone can do it because in your mind it’s just sticking a bunch of images and colors and textures to a blank piece of paper and what results is this awesome collage picture… Well, my class of people try that and it comes out looking like a haphazardly placed stack of paper.
We may also not be very good technical artists; we can only draw the simple shapes that we learned in 2nd grade– circles, squares, the basic outline of a boat, or a turkey from our hands. We simply thrive at other art forms, but we love looking at your mixed media art and try very hard to replicate it in our own styles.
I’ve seen this happen a lot, and it always looks decent enough, but the comments from the creators run along the lines of, “Well, I tried– it doesn’t look how I wanted it to, but I like to hang out in different art style clubs. It’s a great way to expand my horizons. I guess I just won’t do this again.” Let me make another suggestion: Instead of trying to fully immerse yourself in another artistic style, having it not come out the way you like, then giving up, why don’t you take that different art style and actually expand your horizons? Make art how you’re comfortable making it–in your style–and add those elements where appropriate!
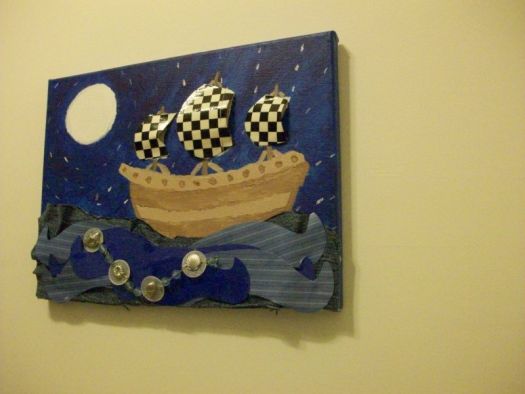
Today I’d like to walk you fine folks through a mixed media painting tutorial. I’m not a super artist (as I said I’m best with simple shapes), but just by adding a bit of layer and texture I’ve managed to make a painting that I’m quite proud of. I enjoyed watching it unfold, and now I enjoy staring at it on my wall!
DO IT YOURSELF!
Conceptualize a picture you may have painted anyway, but before you draw/paint it, think of which parts could be illustrated through different media. I decided to draw a ship at sea and make the water another material, as well as the sails. When choosing your materials keep your horizons broad! I could have made the ship with wood or the moon could have taken some texture and bumped out as a styrofoam ball; I could have used chalkboard paint for the sky and then drawn the stars on with chalk. Use your imagination!
Materials:
– Whatever you normally work with. I used acrylics.
– At least three differently textured or colored materials. I used scrap from a pair of cutoff jeans, dark blue cardstock, patterned scrapbook paper, and patterned duct tape.
– Jewelry, beads, buttons, or some other ‘pop out’ item that fits the theme of the picture. I used a piece of nautical themed jewelry that I bought from my local craft store (Michael’s).

Draw and paint (or whatever your method is) your picture, leaving the mixed media portions undone. (I still painted the sails white because they were going to pop out so I wanted there to be something in the background, though in retrospect it may have looked better if I hadn’t done this!)

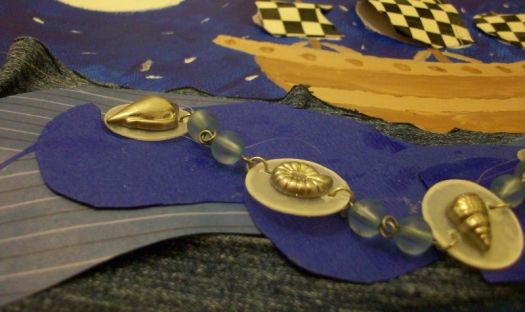
Add the first layer. I used the jeans as the base water level and cut them a tiny bit bigger than the area I had so that I could smother one side in ModPodge and sort of ‘wrinkle’ it into the provided space. Remember that, just like with collages, creating art like this is all about layering! Even if you are drawing a picture with your different media, you’ll still want to keep that in mind. I chose to make my bottom layer thick with texture but isn’t something I necessarily want to be seen front and center. Another method might work better for yours!

Then just add more layers! Add, add, add until you think you have gotten to a visual point that’s good for your picture. I didn’t need many waves to make this stand out but if they were smaller strips or positioned differently I might have. Don’t glue anything down until you test it, either. You’ll be happier with your result if you’re sure before you stick things down permanently.
Now, look at your artwork overall; you might need to do some touch-ups. I added a wave (which I glued on the wrong side initially, oops) to cover up some of the ‘dead ends’ in the waves, cut some corners, snipped some unsightly bits…
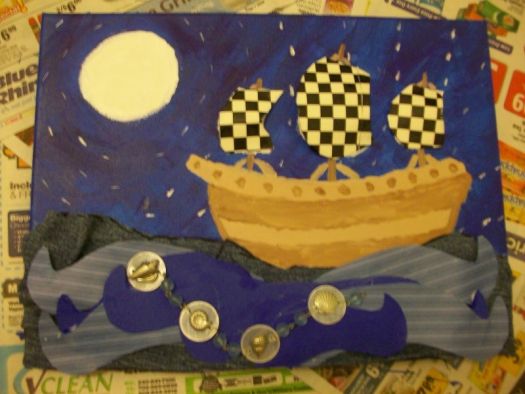
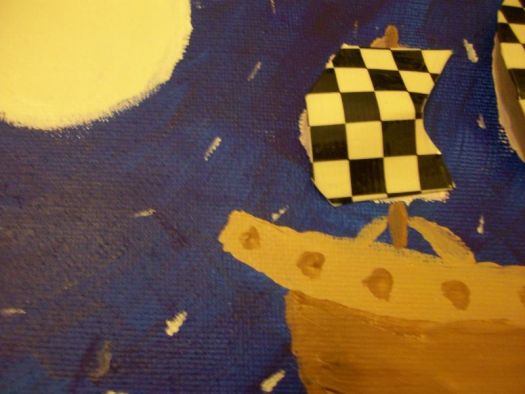
Here I’ve added both the jewelry and the sails. I made the sails by cutting paper slightly larger (but same shape) as the sails that were already painted on, then covering them in a layer or two of my patterned duct tape. I glued both down (positioning it along the ends and in places that might cover up some faults) using a hot glue gun. I used the gun to secure the jewelry just under the shells so the beads hang loose, and the sails have glue just along the top and bottom edges so that they ‘pop up’ a bit like you’d see on a real ship.
That’s it! Wait for your glue to dry and you’re done. See? Simple! All you had to do was think of a picture you were going to create anyway, but use some 3D elements, layers, and textures instead of flat materials and paint, and you’ve created an awesome mixed media painting that reflects you as an artist and is fun to look at!
No need to be intimidated again by seeing the art you admire and seem unable to create! Just find some new, nifty way to incorporate it into your own style. Creativity comes in all forms! I’ve made it my mission to find ways to mix them if I can–and it’s always possible.